I've been fiddling a lot lately with ngrx/store and managed to successfully implement it into a side project I've been working on. This post is just meant to be a refresher for me on how to take a boilerplate Angular project and add in state management with ngrx/store in case I need to this again (and ngrx/store is so awesome that I'm pretty sure I will be using it again. haha). Since this page is just publicly out there for anyone to see and you just so happened to stumble upon it, I guess you can use this post to add ngrx/store to your project too!
Egghead Ngrx/store Video
I'd like to give a quick shout-out to this great video from egghead.io on setting up ngrx/store (Note: if you navigate to that link and it asks you for your email, try to open it up in a private browser window. Or just buy a Pro account, because after all egghead.io is pretty awesome). This is an excellent video that goes through the steps needed to set up ngrx/store properly. l highly recommend it to anyone wanting to use ngrx/store and just getting started. It is a great video, although he goes off on tangents sometimes in this video which can be a little distracting. Also, sometimes it's nice to have the explanation in writing so that you can skim the whole thing quickly, copy code snippets, and easily jump around without getting lost... and that's how this blog post was born!
Source Code
While writing this blog post I created a sample application to give me a boilerplate Angular 2 CLI project and illustrate the concepts in this post. You can check out the full project here:
https://github.com/JimTheMan/Jims-Ngrx-Example
https://github.com/JimTheMan/Jims-Ngrx-Example
Scaffold A New Angular 2 Project
I'm going to start with a new, bare-bones Angular 2 project here so we can see how ngrx can be implemented in it's simplest form. I used the Angular CLI, although you don't have to; any Angular 2 project will work fine with ngrx. I'm navigating into a folder for a git repo that's storing this project. Then I'm going to run this command to create the Angular 2 project:
ng new jims-ngrx-eg --skip-git
Install the Ngrx library
Ok, the first thing you'll want to do is install the library for ngrx/store so that you can use it (duh). You'll also need "ngrx/core" which is just a library that makes it work (not-so-duh). Another not-so-duh thing to remember is that the npm package for all ngrx libraries begins with an at sign ( @ ).
npm install @ngrx/core @ngrx/store --save
Give Your State Management Code A Nice Place To Live
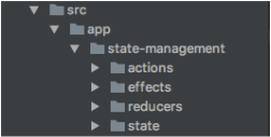
It's important to keep a clean and organized directory structure. I personally like to create a folder called state-management inside of the app directory. Then Inside of that I'll normally create four folders: state, reducers, actions, and effects. For a new Angular CLI project, it should look something like this image:
Create Your State
This part might be a bit controversial as I have yet to see anyone else recommending that you make a separate file for your state. Everyone seems to want to just throw it right into the reducer file. Well, to me this is a much more modular, organized structure so I'm going to do it my way. ;) Inside of the state folder let's create a new file. Since it is possible to have multiple states, I'm just going to name this one "MainState", and I'll create a new main-state.ts file. In here I like to put two things: the interface for your State and the state object's properties' intial values aka the "initial state". One of the great things about TypeScript is that it supports the concept of interfaces. This will allow your IDE to give you much better hinting and code completion later. Here, we define a very simple state that only has one property of type number. We then give it an initial value of 10. We export these so that we can use them in our other files. Here's how my main-state.ts looks when it's all finished:
export interface State {
  counter: number;
};

export const intitialState: State = {
  counter: 10
};
Create An Actions Class
Next, we'll make a class for each one of our actions. In this example I only have one action: Increment. Since we're using TypeScript we can implement the Action interface and force our class to always have a string property named type and an object property named payload. Instead of hardcoding the action type into the class we create a constant named ActionTypes (which we export so that we can refer to it in other files). Check out this blog post for more info on that weird "type" method that we're wrapping around the string constants for our action types.
export const ActionTypes = {
  INCREMENT: type('INCREMENT'),
};

export class Increment implements Action {
  type = ActionTypes.INCREMENT;

  constructor(payload: {someProperty:string, someOtherProperty:boolean}) { }
}

export type Actions =
  Increment;
Notice that we are also exporting a type named Actions. You can't really tell right now since there's only one action in this example, but this is meant to be a TypeScript union type, and we would separate difference actions with the vertical pipe ( | ). For example, if we also had a decrement action, it would look something like this:
export const ActionTypes = {
  INCREMENT: type('INCREMENT'),
  DECREMENT: type('DECREMENT')
};

export class Increment implements Action {
  type = ActionTypes.INCREMENT;

  constructor(payload: {someProperty:string, someOtherProperty:boolean}) { }
}

export class Decrement implements Action {
  type = ActionTypes.DECREMENT;

  constructor(}) { }
}

export type Actions =
  Increment |
  Decrememnt;
Create Your Reducer
Ok, now let's create a reducer. This is where the Redux magic really happens! The reducer is the thing that catches and handles the actions that are dispatched from your smart components (or from your action reducers), and it is also the thing that actually resets the state to a new, modified state. I've pasted in my main-reducer.ts file below. First, take a look at the code. Below the snippet I explain a little about what's going on here.
import {ActionReducer, Action} from "@ngrx/store";
import {State, intitialState} from "../state/main-state";
import {INCREMENT, EVENT_FROM_EFFECT} from "../actions/main-action-creator";

export const mainStoreReducer: ActionReducer<State> =
  (state = intitialState, action: Action) => {

  console.log('Action came in! ' + action.type);

    switch (action.type) {

      case INCREMENT: {
        console.log('Increment action being handled!');
        return {
          counter: state.counter + 1
        }
      }

      case EVENT_FROM_EFFECT: {
        console.log('we cheesin in the reducer over here!');
        return {
          counter: 4
        }
      }

      default: {
        return state;
      }
    }
  };
So, this code snippet above is an example of a reducer. First, we have a few import statements that bring in things from ngrx/store, pull in our state that we create, and then also pull in the actions that we defined. The key property that we are exporting is mainStoreReducer, and you can see that it is of type "ActionReducer" which we brought in from the ngrx/store library (note the pointy braces here. This is making use of a TypeScript feature called generics, but we are basically saying, "Hey, this is an action reducer that is going to return a state defined by our State interface"). Then we are setting this whole mainStoreReducer property to a function. The function is going to accept the state and an Action. Notice Action is capital A because this is an ngrx/store action which basically just means that it has a type and a payload.
Call ProvideStore In NgModule
We're getting closer! Now that we have a reducer created, let's hook it up in our NgModule block. I'll open up my app.module.ts (which was created by the Angular CLI). I've really just added a few imports a single line in the imports array on the object passed into NgModule. We call StoreModule.provideStore and pass in the names of our reducer(s).
import { BrowserModule } from '@angular/platform-browser';
import { NgModule } from '@angular/core';
import { FormsModule } from '@angular/forms';
import { HttpModule } from '@angular/http';

import { AppComponent } from './app.component';
import { mainReducer } from "./state-management/reducers/main-reducer";
import { StoreModule } from "@ngrx/store";

@NgModule({
  declarations: [
    AppComponent
  ],
  imports: [
    BrowserModule,
    FormsModule,
    HttpModule,
    StoreModule.provideStore({mainReducer})
  ],
  providers: [],
  bootstrap: [AppComponent]
})
export class AppModule { }
Inject Store Into Your Smart Components
Ok, now that we're all set up with the state, actions, and reducers, let's dispatch some actions! I'll open up the main app.component.ts that was created by the Angular CLI. Now all we need to do is import Store from ngrx/store and then inject a variable of type store into our constructor. Notice that we're using TypeScript's generics feature here again to tell the Store that our state is of type State, the interface we defined earlier.
import { Component } from '@angular/core';
import { Store } from "@ngrx/store";
import { State } from "./state-management/state/main-state";

@Component({
  selector: 'app-root',
  templateUrl: './app.component.html',
  styleUrls: ['./app.component.css']
})
export class AppComponent {
  title = 'app works!';

  constructor (private store:Store<State>) {
    console.log('We have a store! ' + store);
  }
}
Reading Data From The Store
The store property that you inject has a method called select. Select takes the name of a reducer and returns to you that reducer's state (remember that we used generics when defining the ActionReducer to link that specific reducer with our State interface). If you are into observables and reactive programming this should be familiar to you- the store's subscribe method returns an observable. This means that the pipe "stays open" even after the callback is fired. For us app developers this is awesome because it means that you just hook up your component-to-store binding here with select, and then every time the state changes this subscribe handler will be fired, providing the new state's data to component. Here's an example of how it might look:
import { Component } from '@angular/core';
import { Store } from "@ngrx/store";
import { State } from "./state-management/state/main-state";

@Component({
  selector: 'app-root',
  templateUrl: './app.component.html',
  styleUrls: ['./app.component.css']
})
export class AppComponent {
  title = 'app works!';
  data = '';

  constructor (private store:Store<State>) {

    store.select('mainStoreReducer')
      .subscribe( (data:State )=> {
        this.data = 'data is' + data.counter;
      });


  }
}
Dispatching An Event To The Store
So, we know how to read data from the Store. Now, let's change stuff! Our store property that we injected also has a dispatch method. This sends off an action to be handled by any and all reducers whose switch statement is expecting that particular action. Here's an example of app.component.ts where we dispatch an action of type INCREMENT.
import { Component } from '@angular/core';
import { Store } from "@ngrx/store";
import { State } from "./state-management/state/main-state";
import { INCREMENT } from "./state-management/actions/main-action-creator";

@Component({
  selector: 'app-root',
  templateUrl: './app.component.html',
  styleUrls: ['./app.component.css']
})
export class AppComponent {
  title = 'app works!';
  data = '';

  constructor (private store:Store<State>) {

    store.select('mainStoreReducer')
      .subscribe( (data:State )=> {
        this.data = 'data is' + data.counter;
      });

    this.store.dispatch({ type: INCREMENT });

  }
}
Note that we can also send a payload along with our actions like this:
this.store.dispatch({ type: INCREMENT, payload: {innerObj: {text: "derp!"}} });
And then you can access this payload in your reducer from the actions object like so:
console.log('the payload string is: ' + action.payload.innerObj.text);
And That Closes The Loop!
|
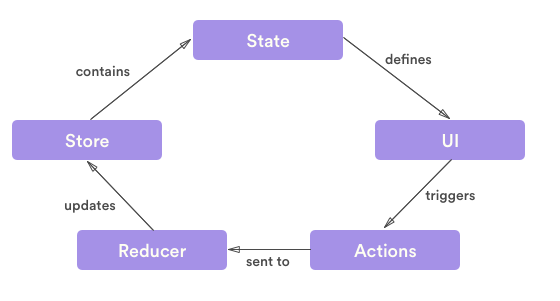
And now we've seen how to implement the full "Redux Loop" in ngrx. This diagram on the right shows how you should understand Redux: as a pattern. I especially like this diagram because it does a nice job of illustrating the idea of one-way data flow.
|
|
Hungry For Async?
Now that you have ngrx/store set up and managing your state, you'll eventually come to the question, "how do I get my async data (for example, pulling from a database) into my state object in the store?". This is a perfectly natural question to ask, and in the world of ngrx we have a companion module to ngrx/store called ngrx/effects. There's a lot to say about ngrx/effects, and to really do it justice I think I need to give it its own blog post. So stay tuned for part two of this project when take on ngrx/effects, and elegantly intertwine our state with our async operations. Oh yeah!
Update: You can check out the Part 2 post about async with ngrx/effects here!
Update: You can check out the Part 2 post about async with ngrx/effects here!


 RSS Feed