This is something I got wrong went I scaffolded out my first CodeStar AWS Lambda pipeline and went to add new environments. To make your project work with AWS CodeStar and CodePipeline you basically need a buildspec.yml and a template.yml file in the root of your project, but that's really it. Then when you connect your source code repository to CodePipeline it will look for these files (or whatever names you have configured for them in the AWS Codepipeline settings) to build and deploy your project.
A Simple Build.spec File
Before my buildspec.yml was WRONG and looked like this:
version: 0.2

phases:
  install:
    commands:
      # Install dependencies needed for running tests
      - npm install

      # Upgrade AWS CLI to the latest version
      - pip install --upgrade awscli
  pre_build:
    commands:
      # Discover and run unit tests in the 'tests' directory
      - npm test
  build:
    commands:
      # Use AWS SAM to package the application using AWS CloudFormation
      - aws cloudformation package --template template.yml --s3-bucket $S3_BUCKET --output-template template-export.yml
      - aws cloudformation package --template template.staging.yml --s3-bucket $S3_BUCKET --output-template template-export.staging.yml
      - aws cloudformation package --template template.prod.yml --s3-bucket $S3_BUCKET --output-template template-export.prod.yml

artifacts:
  type: zip
  files:
    - template-export.yml
    - template-export.staging.yml
    - template-export.prod.yml
Not only is this more verbose than what I'm prosing, but you then need to come update this file every time you want to add or remove an environment. Once I was able to make my template file generic and pointing to environment variables I didn't need to generate and export three different files anymore. So, my final buildspec.yml file just looked this this:
version: 0.2

phases:
  install:
    commands:
      # Install dependencies needed for running tests
      - npm install

      # Upgrade AWS CLI to the latest version
      - pip install --upgrade awscli
  pre_build:
    commands:
      # Discover and run unit tests in the 'tests' directory
      - npm test
  build:
    commands:
      # Use AWS SAM to package the application using AWS CloudFormation
      - aws cloudformation package --template template.yml --s3-bucket $S3_BUCKET --output-template template-export.yml

artifacts:
  type: zip
  files:
    - template-export.yml
I was using a different file for each environment so I could make them somehow different. Perhaps they need to talk to different databases or use different api access keys. It's nice to be able to extract them out of your source code AND out of your template files. The good news is that you can, and you can do it by just referring to regular old environment variables. Next I'll show you how you can make a generic template.yml file.
A Generic Template.yml
The template.yml file is what AWS CodeBuild uses to create all the CloudFormation stuff behind setting up your "stack", which it my case is normally just the serverless function. The main thing you are getting here is the ability to pass the environment variables down from your CodePipeline settings into your lambda function's actual running environment.
AWSTemplateFormatVersion: 2010-09-09
Transform:
- AWS::Serverless-2016-10-31
- AWS::CodeStar

Parameters:
  ProjectId:
    Type: String
    Description: AWS CodeStar projectID used to associate new resources to team members
  Environment:
      Type: String
      Description: AWS CodeStar projectID used to associate new resources to team members

Resources:
  LambdaVersion:
      Type: "AWS::Lambda::Version"
      Properties:
        FunctionName : arn:aws:lambda:us-east-1:954459734159:function:awscodestar-binance-bot-lambda-HelloWorld-16Q9TC43G164R
  HelloWorld:
    Type: AWS::Serverless::Function
    Description: 'a funky func'
    Properties:
      AutoPublishAlias: devers
      Handler: index.handler
      Runtime: nodejs6.10
      Environment:
        Variables:
          NODE_ENV: !Ref 'Environment'
      Role:
        Fn::ImportValue:
          !Join ['-', [!Ref 'ProjectId', !Ref 'AWS::Region', 'LambdaTrustRole']]
      Events:
        GetEvent:
          Type: Api
          Properties:
            Path: /
            Method: get
Notice how in this code above we are using the !Ref, or "intrinsic function reference" as the aws docs like to say. In the way we are using here you can pass it a string representing a key in your environment variables and it will be replaced with the value. Also notice that we need to declare our environment variables as "Parameters" which we do here at the top of the file.
Setting Environment Variables In Code Pipeline
Once you set up your template to be expecting environment variables passed in, you need to actually tell your CI pipeline to create them. In your Deploy action in CodePipeline notice that I'm just using my regular old template.yml from the build artifacts.
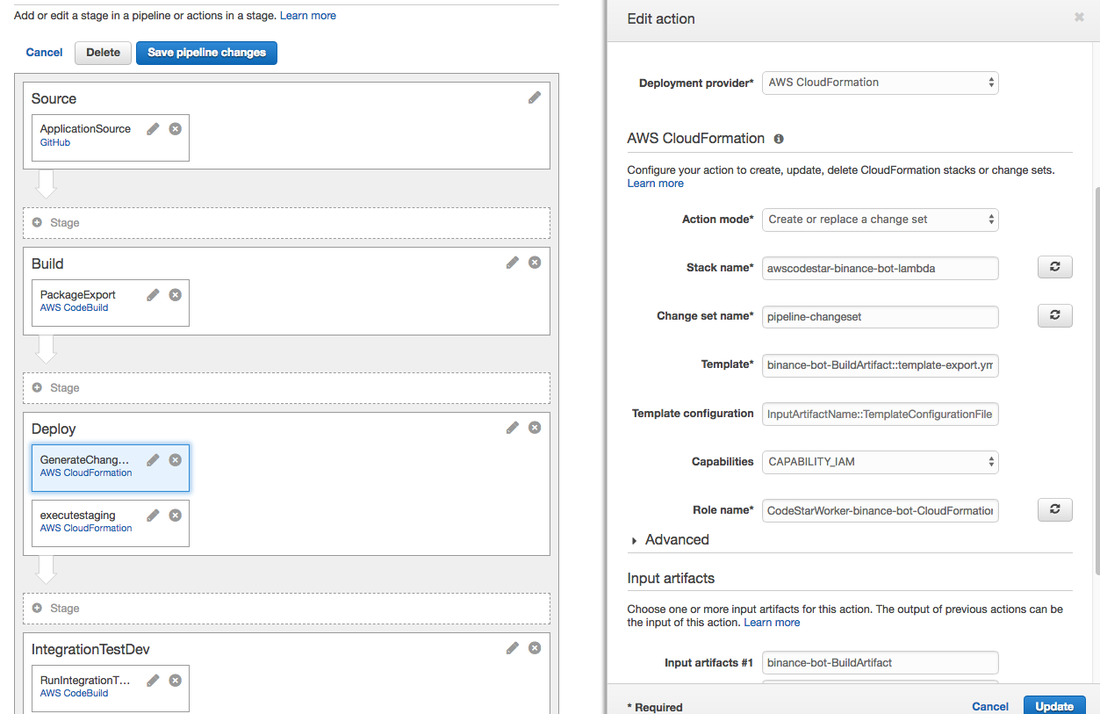
The environment variables is actually hidden away from plain sight. It's also disguised with a "Parameter Overrides" label because Jeff Bezos wishes non-AWS-thinking n00bs them to be pwned into a grey dust cloud of doom and suffering. Anyway, if you expand the Advanced arrow you can see the input box where you can enter an object that basically represents you environment variables for this environment being deployed.
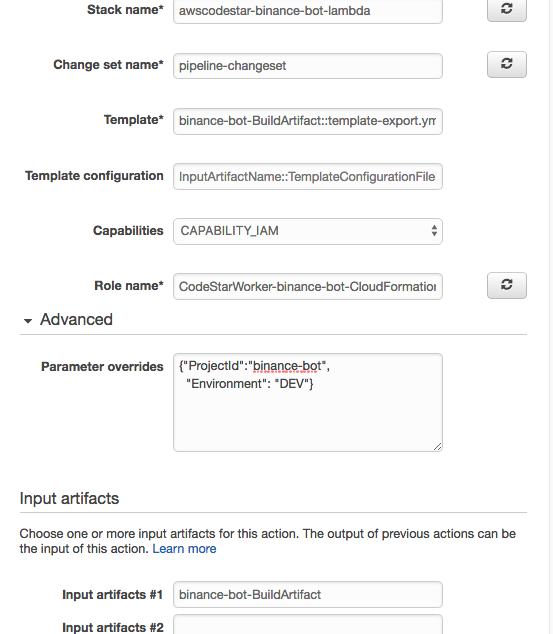
A Staging Environment
Just to show you what things change when I deploy to a different environment, here's an example of my staging environment.

So, you can see in the above configuration of the Staging deploy Codepipe action that I'm still using the same template-export.yml for the Template, but for staging I'm using a different "stack name". If we used the same stack name as dev then our staging environment would get deployed and it would totally overwrite dev, which is not what we want. We want them both to exist independently and so we need to make them different stacks. I'm using the same Role, but I needed to update it in AWS IAM to have permissions the same permissions it had on the dev stack but on this staging stack as well. I'm also setting the 'Environment' key of my environment variables in the Advanced -> Parameter Overrides textbox to SIT for the staging environment.
Thanks RobertSQL
It was Robertsql's answer to my stack overflow question that first got me thinking to just make everything generic and you use one build and template file for all environments. Thanks robertsql!


 RSS Feed