Although I am a huge fan of lambda functions and s3 + cloudfront deployment stacks, in this current project I was using the botkit framework to make a slack chatbot. The framework is awesome, but the only catch was that it needs to be actually deployed on a real server so I had to put on my sys admin hat and fire up some ec2's. I ran into an interesting challenge in that the botkit server wants to run on localhost:3000, but in order to run it securely I need to use port 443. After unsuccessfully trying a few simpler hacks I bit the bullet and chose to use nginx as a reverse proxy here. I hadn't had much hands-on experience with nginx before this project so it was definitely a learning experience for me, and this post will be basically a walkthrough of the things I did to get it up and running.
EACCESS Erros
I am building off of the example starter botkit project, and by default the application is running on port 3000. This is all well and good for developing, but when I want to run it for real on https I need to change the port to 443. I naively just changed the port in the config file, and sadly... it didn't work. Instead, it gave me EACCESS errors. ?
The Nginx Route
When speaking with Ben Brown, the creator and core maintainer of botkit, he told me that all of the instances he had seen of botkit being deployed had used nginx to get the job done for ssl. So, after trying unsuccessfully to use pm2 with authbind I decided to go that route, and eventually it worked! I was a bit hesitant to get into nginx because the docs get kind of hairy and quickly gets very specific according to your linux distro, etc- and also because it sounds like, "engine sex", and having sex with some type of combustion engine does not sound fun for anyone. Anyway, it wasn't that bad although the config files it uses are weird af.
Project Setup
|
1. ssh into your server
|
ssh -i ./my-key.pem ubuntu@my-server.amazonaws.com
clone project
git clone https://github.com/myproject.git
Setup pm2 running app on port 3000
npm start
pm2 start ecosystem.config.js --env prod
Domain Name
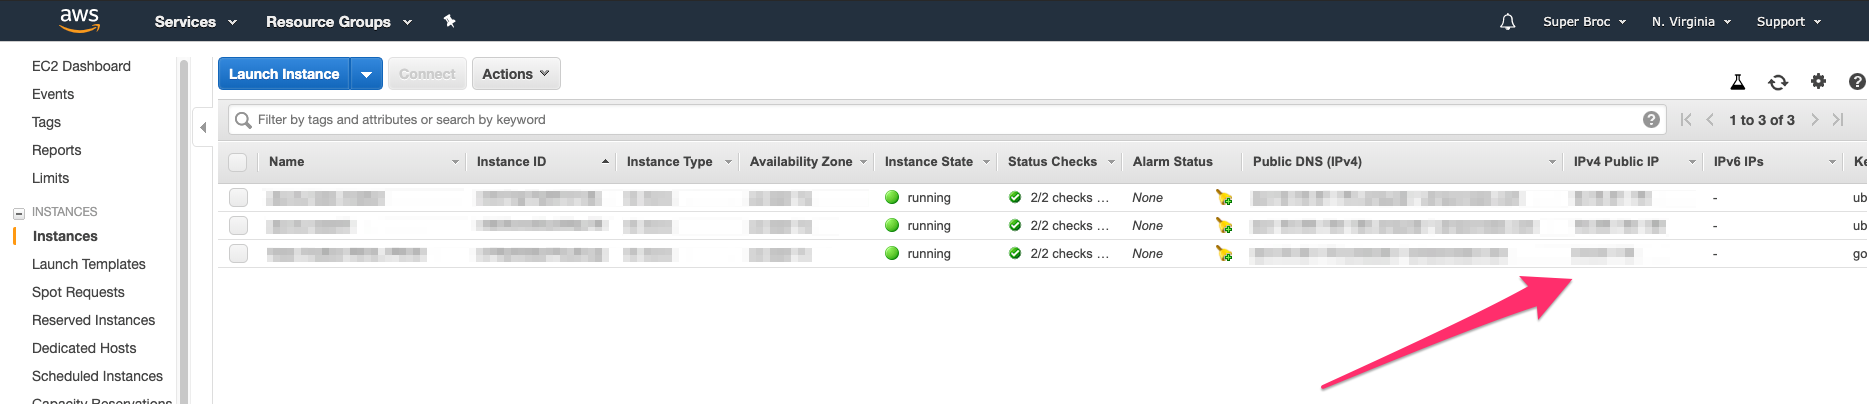
In my control panel I had an A record and AAAA record already there, both pointing to ip of the host from which I bought the domain. I change these two to point to my Amazon Ec2 server's IP address, and after that it worked (note: if you don't do this you'll try to get an error when you run certbot. Certbot requires a domain name to create a ssl certificate).
IP addresses for your domain A records...
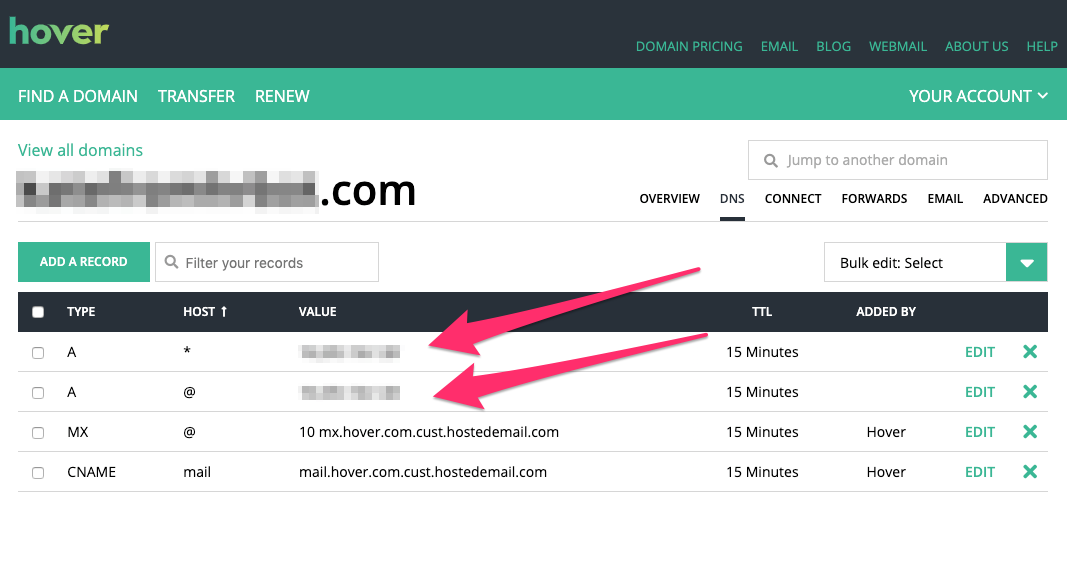
...should be the same as the IP address of your ec2 server (assuming you are only running one server and not a cluster, cloudfront distribution, or something like that).
Certbot With --Nginx
Find instructions for your server distro here: https://certbot.eff.org/lets-encrypt/ubuntuxenial-nginx
For example, here are the commands I ran for my modern, free-tier ec2 ubuntu:
sudo apt-get update
sudo apt-get install software-properties-common
sudo add-apt-repository universe
sudo add-apt-repository ppa:certbot/certbot
sudo apt-get update
Then I run this command to install "certbot", the handy little executable that runs a nice, interactive shell program which then gets you your ssl certificate for free.
sudo apt-get install certbot python-certbot-nginx
And once it's installed just run it with the --nginx flag.
sudo certbot --nginx
After running `sudo certbot --nginx` the terminal will go through a series of interactive prompts. I basically just agree to all the initial questions, and then when it says, "No names were found in your configuration files. Please enter in your domain names(s) (comma and/or space separated)" I will usually enter my domains names in this format that accepts the domain either with or without the "www." prefix.
www.mycooldomain.com,mycooldomain.com
After this it asks whether you would like to automatically redirect HTTP traffic to HTTPS. Personally, I don't want to offer a secure version of my site and an insecure version because then hackers can just go and exploit the insecure version! So, unless there is a compelling argument for wanting to allow the insecure HTTP requests I would recommend just entering 2 here to redirect all requests to HTTPS.
You should then see an output that looks something like this:
Congratulations! You have successfully enabled https://mycooldomain.com and
https://www.mycooldomain.com
You should test your configuration at:
https://www.ssllabs.com/ssltest/analyze.html?d=mycooldomain.com
https://www.ssllabs.com/ssltest/analyze.html?d=www.mycooldomain.com
- - - - - - - - - - - - - - - - - - - - - - - - - - - - - - - - - - - - - - - -
IMPORTANT NOTES:
- Congratulations! Your certificate and chain have been saved at:
/etc/letsencrypt/live/mycooldomain.com/fullchain.pem
Your key file has been saved at:
/etc/letsencrypt/live/mycooldomain.com/privkey.pem
Your cert will expire on 2019-12-17. To obtain a new or tweaked
version of this certificate in the future, simply run certbot again
with the "certonly" option. To non-interactively renew *all* of
your certificates, run "certbot renew"
Botkit Specific Things
Final Tweaks To Nginx Config File(s)
Although I ran certbot with the --nginx flag, I still needed to change another nginx config file to get it all working and served up on HTTPS, and this was the file "/etc/nginx/sites-available/default" (no extension, I know it's weird, but no file extension haha). After a lot of throwing f'ed up config files into nginx and watching it blow up, I was able to settle upon a nice, clean config file that takes my server running on localhost:3000 and proxies the traffic through 443 instead. Also, because of the location of the file and default permissions I needed to use sudo to edit the file.
sudo vim /etc/nginx/sites-available/default
/etc/nginx/sites-available/default
server {
        listen 80;
        server_name mydomain.com www.mydomain.com;
        return 301 https://$host$request_uri;
}

server {
        listen 443 ssl;
        server_name mycooldomain.com www.mycooldomain.com;
        ssl_certificate /etc/letsencrypt/live/mycooldomain.com/fullchain.pem;
        ssl_certificate_key /etc/letsencrypt/live/mycooldomain.com/privkey.pem;

        ssl_protocols TLSv1 TLSv1.1 TLSv1.2;
        ssl_prefer_server_ciphers on;
        ssl_ciphers 'EECDH+AESGCM:EDH+AESGCM:AES256+EECDH:AES256+EDH';
        location /  {
                proxy_pass    http://localhost:3000;
                proxy_http_version 1.1;
                proxy_set_header Upgrade $http_upgrade;
                proxy_set_header Connection 'upgrade';
                proxy_set_header Host $host;
                proxy_cache_bypass $http_upgrade;
        }
}
After you change your nginx configs, you can check that it's a valid syntax by running nginx with the -t flag. You may not need to use sudo here, but I did.
sudo nginx -t
Then you can restart nginx like this.
systemctl restart nginx
Woohoo, Now Use Your Hot, Secure New Site / Server!
That's all folks! Enjoy your server running a new fancy domain all securely on HTTPS, and do leave a comment here if you have any tips, comments, or issues. Thanks and happy developing! ✌️


 RSS Feed